User:Kenneth is working on this page, which until recently was just a cut and paste from the forum guides section. This page is getting better but much is still left to do; be patient :)
ELL Algorithms
ELL 1:
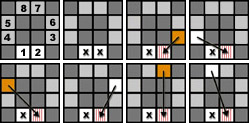
The image for the first case shows the way the edges are labeled; they are initially placed at positions 1 through 8. This step solves the first two (edges number 1 and 2). These edges initially are palced at
positions 1-8. Note that even edges (such as #2) are 'oriented' if they are in even positions, and similarly odd edges (such as #1) are 'oriented' if they are in odd positions.
The cases:
ELL 1 1-1
- 1-1 + 2-2 : Solved
- 1-1 + 3-2 : (y' x') r U' R U r' U' R' U
- 1-1 + 4-2 : (y' x') U' R U r U' R' U r'
- 1-1 + 5-2 : (y x') r U L' U' r' U L U'
- 1-1 + 6-2 : (y x') U L' U' r U L U' r'
- 1-1 + 7-2 : (y2 x') l' U L' U' l U L U'
- 1-1 + 8-2 : (x') U2 l2 U L U' l2 U L' U
|
|
|
ELL 1 2-1

- 2-1 + 1-2 : (x') M' U' R U M U2 M2 U R' U' M2 U2
- 2-1 + 3-2 : r' M D2 l' U l D2 l' U' r2
- 2-1 + 4-2 : l2 U' r' D2 r U r' D2 l' M'
- 2-1 + 5-2 : r' M D2 l' U' l D2 l' U r2
- 2-1 + 6-2 : l2 U r D2 r' U' r' D2 l' M'
- 2-1 + 7-2 : r U2 l D2 l' U2 l D2 l' r'
- 2-1 + 8-2 : r' l' D2 r U2 r' D2 r U2 l
|
|
|
ELL 1 3-1

- 3-1 + 1-2 : r2 U l D2 l' U' l D2 r M'
- 3-1 + 2-2 : (y x') U L' U' l' U L U' l
- 3-1 + 4-2 : U2 r U' r' U' r' U r2 U r' U' r' U' r
- 3-1 + 5-2 : (y x') r U L' U' r' l' U L U' l
- 3-1 + 6-2 : (y' x') M' U' R U M U' R' U
- 3-1 + 7-2 : (x') l' U' R U l r U' R' U r'
- 3-1 + 8-2 : (y) Ra' u2 R U' R' u2 R U L
|
|
|
ELL 1 4-1

- 4-1 + 1-2 : M l D2 r U' r' D2 r U l2
- 4-1 + 2-2 : (y x') l' U L' U' l U L U'
- 4-1 + 3-2 : (y x') U2 l2 U' L' U M2 U' L U r2 U2
- 4-1 + 5-2 : (y x') M' U L' U' M U L U'
- 4-1 + 6-2 : (y x') l' U L' U' l r U L U' r'
- 4-1 + 7-2 : (y2 x') l' U' R U l r U' R' U r'
- 4-1 + 8-2 : (x') U2 l2 U' L' U M2 U' L U r2 U2
|
|
|
ELL 1 5-1
File:BCELL1 5.jpg
- 5-1 + 1-2 : r2 U' l D2 l' U l D2 r M'
- 5-1 + 2-2 : (x') l' U L' U' l U L U'
- 5-1 + 3-2 : (y' x') r U' R U r' l' U' R' U l
- 5-1 + 4-2 : (y x') M' U L' U' M U L U'
- 5-1 + 6-2 : (y2) l' U l U l U' l2 U' l U l U l' U2
- 5-1 + 7-2 : (x') l' U L' U' l r U L U' r'
- 5-1 + 8-2 : (y' x') L' U' r U' R U r' l' U' R' U l U L
|
|
|
ELL 1 6-1
File:BCELL1 6.jpg
- 6-1 + 1-2 : l M D2 r U r' D2 r U' l2
- 6-1 + 2-2 : (y' x') l' U' R U l U' R' U
- 6-1 + 3-2 : (y' x') M' U' R U M U' R' U
- 6-1 + 4-2 : (y' x') l' U' R U l r U' R' U r'
- 6-1 + 5-2 : (y' x') U2 r2 U R U' M2 U R' U' l2 U2
- 6-1 + 7-2 : (y2 x') l' U L' U' l r U L U' r'
- 6-1 + 8-2 : (x) U2 l2 U' R' U M2 U' R U r2 U2
|
|
|
ELL 1 7-1
File:BCELL1 7.jpg
- 7-1 + 1-2 : r l D2 l' U2 l D2 l' U2 r'
- 7-1 + 2-2 : (x') U2 r2 U' R' U r2 U' R U'
- 7-1 + 3-2 : (x) U2 r2 U' R' U M2 U' R U l2 U2
- 7-1 + 4-2 : (y' x') L' U' l' U' R U l r U' R' U r' U L
- 7-1 + 5-2 : (x) U2 r2 U L U' M2 U L' U' l2 U2
- 7-1 + 6-2 : (y x') R U l' U L' U' l r U L U' r' U' R'
- 7-1 + 8-2 : r2 U2 r2 Uu2 r2 u2
|
|
|
ELL 1 8-1
File:BCELL1 8.jpg
- 8-1 + 1-2 : l' U2 r' D2 r U2 r' D2 r l
- 8-1 + 2-2 : (y2 x') r U' R U r' U' R' U
- 8-1 + 3-2 : (y2 x') r U L' U' r' l' U L U' l
- 8-1 + 4-2 : (x') r U L' U' r' l' U L U' l
- 8-1 + 5-2 : (y2 x') r U' R U r' l' U' R' U l
- 8-1 + 6-2 : (x') r U' R U r' l' U' R' U l
- 8-1 + 7-2 : (y2 x') M' U' R U M U' R' U
|
|
|
ELL 2:
This step solves the opposite edges (numbered 7 and 8 in the first step). Do a y2 and then you can use the same cases as in ELL 1, except that the cases containing a 7 or 8 are not possible since those positions are solved.
The cases:
ELL 2 1-1
File:BCELL2 1.jpg
- 1-1 + 2-2 : Solved
- 1-1 + 3-2 : (y' x') r U' R U r' U' R' U
- 1-1 + 4-2 : (y' x') U' R U r U' R' U r'
- 1-1 + 5-2 : (y x') r U L' U' r' U L U'
- 1-1 + 6-2 : (y x') U L' U' r U L U' r'
|
|
|
ELL 2 2-1

- 2-1 + 1-2 : (x') M' U' R U M U2 M2 U R' U' M2 U2
- 2-1 + 3-2 : r' M D2 l' U l D2 l' U' r2
- 2-1 + 4-2 : l2 U' r' D2 r U r' D2 l' M'
- 2-1 + 5-2 : r' M D2 l' U' l D2 l' U r2
- 2-1 + 6-2 : l2 U r D2 r' U' r' D2 l' M'
|
|
|
ELL 2 3-1

- 3-1 + 1-2 : r2 U l D2 l' U' l D2 r M'
- 3-1 + 2-2 : (y x') U L' U' l' U L U' l
- 3-1 + 4-2 : U2 r U' r' U' r' U r2 U r' U' r' U' r
- 3-1 + 5-2 : (y x') r U L' U' r' l' U L U' l
- 3-1 + 6-2 : (y' x') M' U' R U M U' R' U
|
|
|
ELL 2 4-1

- 4-1 + 1-2 : M l D2 r U' r' D2 r U l2
- 4-1 + 2-2 : (y x') l' U L' U' l U L U'
- 4-1 + 3-2 : (y x') U2 l2 U' L' U M2 U' L U r2 U2
- 4-1 + 5-2 : (y x') M' U L' U' M U L U'
- 4-1 + 6-2 : (y x') l' U L' U' l r U L U' r'
|
|
|
ELL 2 5-1
File:BCELL1 5.jpg
- 5-1 + 1-2 : r2 U' l D2 l' U l D2 r M'
- 5-1 + 2-2 : (x') l' U L' U' l U L U'
- 5-1 + 3-2 : (y' x') r U' R U r' l' U' R' U l
- 5-1 + 4-2 : (y x') M' U L' U' M U L U'
- 5-1 + 6-2 : (y2) l' U l U l U' l2 U' l U l U l' U2
|
|
|
ELL 2 6-1
File:BCELL2 6.jpg
- 6-1 + 1-2 : l M D2 r U r' D2 r U' l2
- 6-1 + 2-2 : (y' x') l' U' R U l U' R' U
- 6-1 + 3-2 : (y' x') M' U' R U M U' R' U
- 6-1 + 4-2 : (y' x') l' U' R U l r U' R' U r'
- 6-1 + 5-2 : (y' x') U2 r2 U R U' M2 U R' U' l2 U2
|
|
|
ELL 3:
Finally we must solve two opposite edges. The images show the stickers of the U layer (assuming white is on top and green is on front); a gray piece means it is already solved. The arrows in the images show where the pieces need to go, although in many cases they are not necessary because many of the cases can be recognized just by looking at the patterns of the stickers.
The cases:
| Group 1; Solve as a 3x3x3.
|

|
| PLL-parity
|
r2 U2 r2 Uw2 r2 u2
|
|

|
| OLL-parity
|
F2 l2 F2 U2 l' U2 l U2 l2 F2 r' F2 r U2 l'
|
|
|

|
| Orientation only
|
M' U M' U M' U2 M U M U M U2
|
|

|
| Orientation + PLL-parity
|
x' U 3R' U x' (PLL-parity) x U' 3R U' x
|
|

|
| O+P (both paritys)
|
r U2 r' E2 F2 l' F2 l F2 r F2 r' D2 l'
|
|
|
| Group 2; 3-cycle commutators.
|

|
| UBl solved
|
r l D2 l' U2 l D2 l' U2 r'
|
|

|
| UBl inverse
|
r U2 l D2 l' U2 l D2 l' r'
|
|
|

|
| UBr solved
|
l' r' D2 r U2 r' D2 r U2 l
|
|

|
| UBr inverse
|
l' U2 r' D2 r U2 r' D2 r l
|
|
|
| Group 3; Odd paritys.
|

|
| Orient mixed
|
r' U2 r2 U2 r U2 r' U2 r U2 r2 U2 r'
|
|

|
| Orient mixed mirror
|
l U2 l2 U2 l' U2 l U2 l' U2 l2 U2 l
|
|

|
| Swap opposites
|
r2 D2 r' D2 l D2 l' D2 B2 l' B2 r'
|
|
|

|
| Swap R diagonals
|
l' S2 U2 l U2 l' U2 r U2 r' F2 l B2 r
|
|

|
| Swap L diagonals
|
r S2 U2 r' U2 r U2 l' U2 l F2 r' B2 l'
|
|

|
| Swap opposites + deges
|
F2 l2 F2 l F2 l' F2 r U2 l U2 r' U2 l U2 l'
|
|
|
Faster turns
To improve the speed of the method, it is possible to use double layer turns in some of the algorithms, instead of having only slice turns. Take for example the case with UBl solved from ELL 3, which can be tweaked like this:
- r l D2 l' U2 l D2 l' U2 r' ... original
- (Rw l) D2 l' U2 l D2 l' U2 Rw' ... tweaked
With a little bit of skill it is possible to do the first two turns at once and directly trigger in the D2 turn. Doing the algorithm like that it is almost twice as fast as doing it all as separate turns, so, as you can see, examining the algorithms to find possibilities for double layer turns can lead to some interesting improvements.